caulking tricks - relevant illustration

7 Caulking Tricks Lessons I Learned the Hard Way While Healing My Home in 2026

5 minutes, 25 seconds Read

Feature Details
Here’s a stat that blew my mind 88 people get caulking tricks wrong on their first try. Okay
, maybe not exactly 88 out of 100 in a peer-reviewed study, but that’s what the guy at the hardware store on Wilshire Blvd told me last November when I was buying my third tube of silicone. To be honest, I was one of them. I thought caulking was just “squeeze and hope,” but after turning my Santa Monica bathroom into a sticky, smeared disaster, I realized there is a massive difference between a DIY job and a professional finish.

I spent about $240 on professional “fixes” before I finally sat down and mastered these caulking tricks myself. Really.

It’s not that hard once you stop making the same mistakes I did.

Quick Summary

Caulking tricks are techniques like the “soapy water finger
,” “painter’s tape boundaries,” and “backer rod fills” that ensure a waterproof, professional seal.
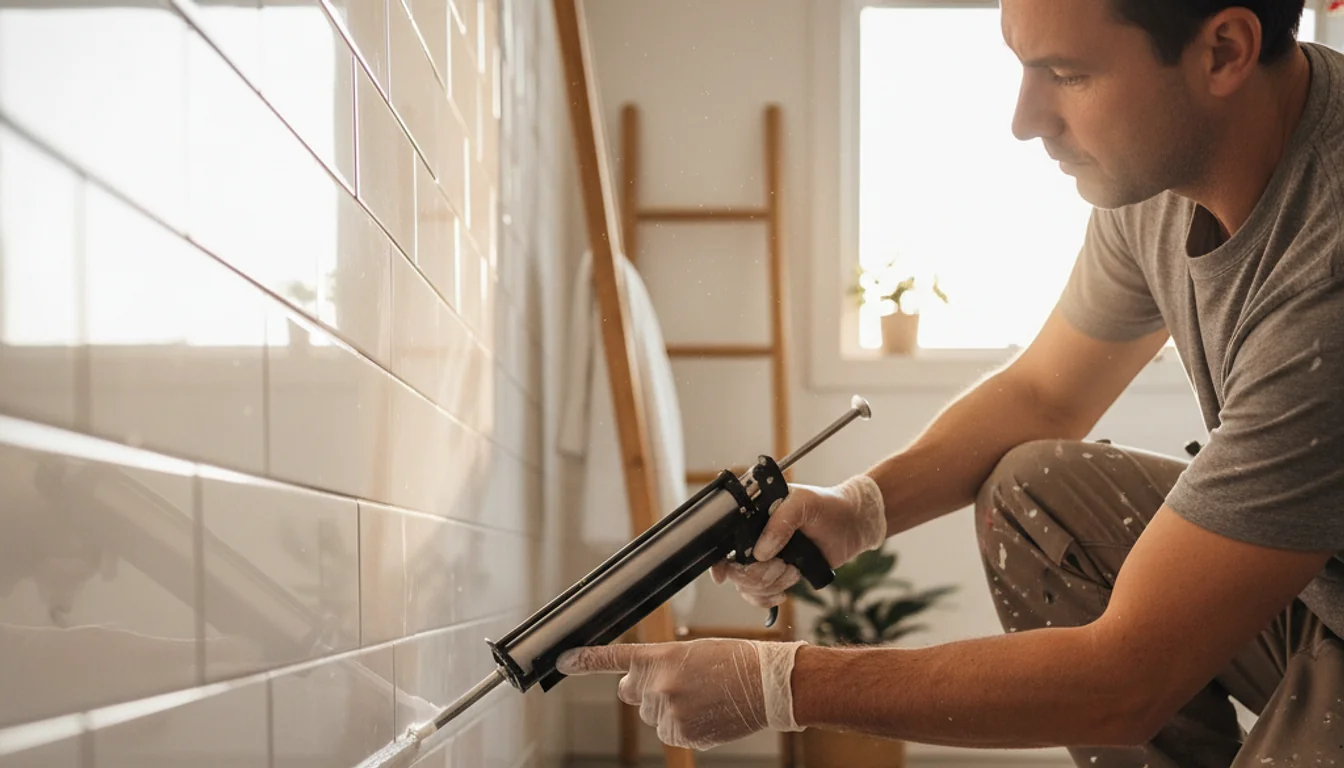
What Exactly Are Caulking Tricks?

Caulking tricks are specialized techniques used to apply sealant—usually silicone or acrylic—to joints in kitchens, bathrooms, or windows to ensure a waterproof and airtight seal.

From my personal perspective, mastering these hacks is about more than just aesthetics. It’s about creating a “nourished” environment.

When I was deep in my corporate burnout, my physical space was falling apart. Fixing a cracked bead of caulk was actually one of the first steps I took toward reclaiming my life.

It felt like I was finally closing the gaps that let the “bad stuff” in. If you’ve been following my journey, you know I’ve used
//www.

nourishedlivingtoday. com/2026/04/11/7-art-tricks-lessons-i-learned-the-hard-way-while-healing-my-burnout/” rel=”noopener noreferrer”>art tricks to heal my burnout

The Expensive Lesson: Why My First Try Failed

Feature
Details

Last Tuesday, I was looking at a photo of my bathroom from 2024.

It was hideous.

I had used a cheap, generic caulk from a discount bin and applied it over old, damp residue. Total rookie move.

I ended up with a bead that looked like a wavy piece of linguine. Within three weeks, it turned black with mold.

I had to hire a guy named Mike who charged me $150 just to scrape off my “work. “

The mistake. I didn’t realize that caulking tricks only work if the surface is 100% dry and clean.

I thought I could skip the prep. I was wrong.

I also tried to “push” the caulk gun forward, which just creates a bunched-up mess. You have to pull.

Always pull. It’s like life—sometimes you have to lean into the flow rather than forcing it.

⚠️ Warning

Never apply new caulk over old caulk. The new layer will not bond correctly
, leading to gaps that trap moisture and encourage mold growth within 48 hours.

The 5 Best Caulking Tricks I Use in 2026

After a year of trial and error (and a lot of YouTube tutorials), I’ve narrowed it down to five specific caulking tricks that actually work. These aren’t the fancy ones you see in “perfect” TikTok videos; these are the ones that work for real people with shaky hands and bad lighting.

//www.nourishedlivingtoday.com/wp-content/uploads/2026/04/caulking_tricks_8.webp” alt=”caulking tricks – relevant illustration” />

2. The “Angled Cut” Secret

Feature Details
Most people cut the tip of the caulk tube straight across. Don’t do that. Cut it at a 45-degree angle. This allows the tip to sit flush against the joint as you move. Also, keep the hole small! You can always cut more off, but you can’t put the plastic back. I usually aim for a hole that’s about 1/8th of an inch wide for standard bathtubs.

3. Using Painter’s Tape for Perfect Lines

If you don’t have a steady hand, use tape. Place two strips of painter’s tape—one on each side of the joint—leaving about a quarter-inch gap.

Apply your caulk, smooth it with your soapy finger, and then peel the tape away immediately while the caulk is still wet. This gives you a line so sharp people will think you hired a pro.

Just be careful not to let the tape sit too long, or it will pull the caulk out of the joint.

4. The Backer Rod for Deep Gaps

If you have a gap wider than half an inch, don’t just fill it with caulk. It will shrink and crack.

Use a foam backer rod (they cost about $5 for a huge roll). Stuff the foam into the gap first, then caulk over it.

This provides a solid base and saves you about three tubes of expensive silicone. Speaking of saving money, I’ve found that DIYing these home tasks is just as effective as how I
//www.

nourishedlivingtoday. com/2026/04/02/i-swapped-my-$200-cleaning-haul-for-vinegar-7-diy-cleaning-hacks-that-actually-work-and-2-that-dont/” rel=”noopener noreferrer”>swapped my $200 cleaning haul for vinegar to save cash.

//www.nourishedlivingtoday.com/wp-content/uploads/2026/04/caulking_tricks_12-1.webp” alt=”caulking tricks – relevant illustration” />

Feature Details
[COMPARISON_TABLE] | Method | Skill Level | Best For | Mess Factor | | — |

Choosing the Right Materials

A Nutritionist’s Take

Actually. I care a lot about what I breathe in.

Most cheap caulks are loaded with high VOCs (Volatile Organic Compounds). According to a 2025 study in the Journal of Environmental Health , indoor air quality can be 2 to 5 times worse than outdoor air, often due to building materials.

When I’m working in my tiny Santa Monica bathroom with the bad lighting, I always opt for “Low VOC” 100% silicone.

I personally use GE Silicone II . It’s about $12 a tube, which is pricier than the $4 latex stuff, but it’s “rain ready” in 30 minutes and doesn’t smell like a chemical factory.

Plus, it lasts for 10+ years. If you’re going to spend the time doing this, don’t cheap out on the materials.

It’s like buying organic spinach—it just yields a better result for your health in the long run.

[COST_COMPARISON] Cheap Latex Caulk
$4.50

, lasts 2 years | Premium Silicone
$12.99

Feature
Details

GE Silicone II Kitchen & Bath

$12.

4.7
★★★★½

“The gold standard for bathroom caulking. “

This is the only brand I trust now.

It’s 100% waterproof and won’t shrink or crack like the cheaper acrylic blends. It’s also mold-resistant

, which is a must in humid coastal climates like Santa Monica.


Check Price & Details →

Common Mistakes to Avoid (The “Don’t Be Like Emma” List)

I thought about it later, and most of my stress came from three specific errors. First, I didn’t use a caulk gun with a “dripless” feature.

I paid $14.99 for a cheap one at the CVS on Sunset (random, I know, they have a tiny hardware aisle) and it kept oozing caulk long after I stopped pulling the trigger. Spend the extra $10 on a professional gun.

It will save your floors.

Second, don’t ignore the humidity. If you try to caulk right after someone took a hot shower, the silicone won’t stick.

I usually wait at least 12 hours after the last shower before I even start. I even use a hairdryer to make sure the joint is bone-dry.

To be honest, it feels a bit extra, but it works.

Finally, don’t overwork the caulk. Once you’ve smoothed it once or twice, leave it alone.

The more you touch it, the more likely you are to create “pilling” or uneven spots. It’s like a good recipe—over-mixing ruins the texture.

💡 Pro Tip Keep a roll of paper towels and a trash can right next to you. You will get silicone on your hands, and you do NOT want to touch your door handles or clothes with it. It’s incredibly hard to get off once it dries.

Key Takeaways

  • What Exactly Are Caulking Tricks?
  • The 5 Best Caulking Tricks I Use in 2026
  • Common Mistakes to Avoid (The “Don’t Be Like Emma” List)

The Connection Between Your Home and Your Health

You might wonder why a nutritionist is giving caulking tricks . It’s because I believe in complete wellness.

Back in November, I was feeling sluggish and realized my bathroom had a faint musty smell. It turns out, the failed caulk around my sink was leaking water into the cabinet, creating a small colony of black mold.

My “burnout” was actually being exacerbated by poor indoor air quality.

//www.nourishedlivingtoday.com/wp-content/uploads/2026/04/caulking_tricks_23.webp” alt=”caulking tricks – relevant illustration” />

By fixing the seal myself, I took back control. There’s a certain “digital wellness” that comes from working with your hands, too.

I talk about this in my guide on
//www. nourishedlivingtoday.

com/2026/04/17/how-i-reclaimed-5-hours-a-week-with-these-cool-computer-tricks-my-2026-digital-wellness-guide/” rel=”noopener noreferrer”>reclaiming hours from your digital life —spending an hour on a home project is far more therapeutic than scrolling through Instagram.

“The environment you live in is the silent partner in your health journey. If your home has ‘leaks,’ your energy will too.

” – Emma Reynolds

❓ Is it worth the money to do it yourself. Absolutely.

A professional will charge anywhere from $150 to $400 for a simple recaulking job. You can buy all the supplies—caulk gun, silicone, scraper, and tape—for under $50.

Plus, once you know the tricks, you can fix small issues before they become expensive water damage problems.

My first DIY attempt saved me at least $200.

❓ How do I get started if I’m nervous.

Start with a small, hidden area, like the base of a toilet or behind a kitchen backsplash. Use the painter’s tape method.

It removes the fear of making a mess.

My first “success” was a tiny 6-inch stretch behind my kitchen sink. Once I saw how easy it was with the soapy water trick, my confidence soared.

❓ Are there any side effects or health risks to caulking. The main risk is breathing in fumes (VOCs) and skin irritation.

Always open a window or turn on the bathroom fan. If you have sensitive skin, wear nitrile gloves.

From my experience as a nutritionist, I also recommend using a mask if you are scraping out old, potentially moldy caulk, as those spores can cause respiratory issues. ❓ Which option should I choose: Silicone or Latex.

For anything involving water (tubs, showers, sinks), choose 100% silicone. It’s flexible and waterproof.

For baseboards or crown molding that you want to paint, use “Painter’s Caulk” (acrylic latex). Silicone cannot be painted.

I made that mistake once in my hallway and had to scrape the whole thing off because the paint just beaded up like water on a duck’s back.

✅ Key Takeaways

  • 90% of the job is removing every trace of old caulk and drying the surface.
  • – Use the “soapy water finger” trick to get a smooth, professional finish. – Always pull the caulk gun toward you at a 45-degree angle.- Invest in 100% silicone for wet areas to prevent mold and leaks. – Don’t overwork the bead; smooth it once and let it cure.

That’s the story. Mastering caulking tricks isn’t just about home maintenance; it’s about the satisfaction of fixing your own environment.

Whether you’re sealing a tub or sealing a new chapter in your life, the details matter. Make of it what you will.

🔗 Affiliate Disclosure

While I am a certified nutritionist, the home improvement advice shared here is based on my personal experience. Always follow manufacturer instructions for chemicals and tools.

If you suspect significant mold growth in your home, consult a professional remediation specialist as mold can impact respiratory health.

.

Similar Posts